How to deploy an SSH honeypot to AWS Lightsail VPS

In this blog post we'll deploy the honeypot we made in the previous post (How to build an SSH honeypot in Python and Docker - Part 2) to Amazon Web Services (AWS) Lightsail VPS.
Contents
- Create an AWS Lightsail instance
- Configure Lightsail VPS
- Install Docker
- Install Docker Compose
- Install the SSH honeypot
- Optional: disable Ubuntu daily updates
Create an AWS Lightsail instance
In the first part of this tutorial we'll create a new AWS Lightsail instance. These are the steps we'll take:
- Login to AWS Lightsail and create new instance
- Choose instance location
- Select Linux/Unix
- OS only: Ubuntu 20.04
- Download SSH key pair
- Select ASW Lightsail plan
- Name the instance
- Ready to create
Step 1
First up, let's create a new Lightsail VPS. Head over to aws.amazon.com/lightsail -- If you don't already have an account with Amazon AWS you'll need to set one up. Amazon currently have an offer where you can try Lightsail free for 3 months. Once logged in, click the "Create new instance" button.
Step 2
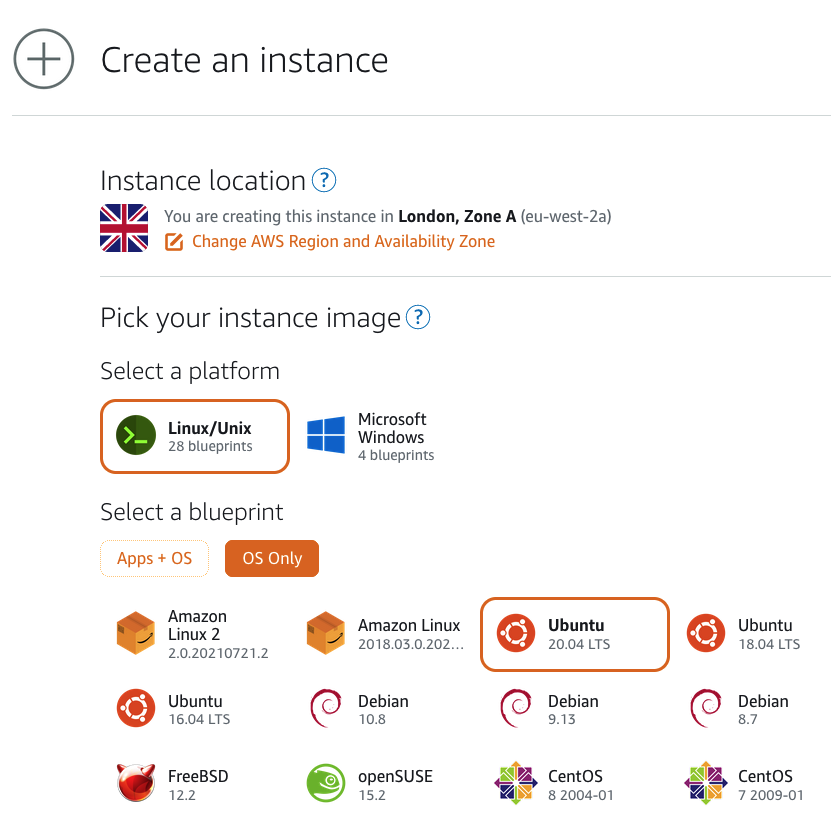
Under "Instance location" it'll default to your nearest Zone. For me, that's London, Zone A. Feel free to select whichever zone you prefer.
Step 3
For the instance image, select "Linux/Unix".
Step 4
Under "Select a blueprint" choose "OS Only" then "Ubuntu 20.04 LTS" (the most up-to-date version of Ubuntu available on AWS at time of writing).
Step 5
Under "Optional" click "change SSH key pair" then download the default key (if you haven't previously). Save the key to your operating system's default SSH key storage location (on macOS it's the hidden directory ~/.ssh/).

Step 6
Select a plan for your new Lightsail instance. The starter plan ($3.5 per month) is fine for our honeypot.

Step 7
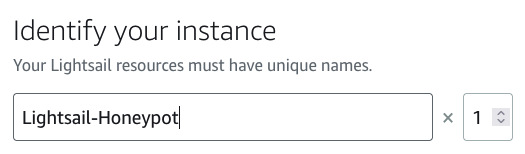
Finally, give your new honeypot a unique name:
Step 8
That's everything we need to create our new instance. Go ahead and click the "create instance" button and it'll be created for you.
Configure the Lightsail VPS
If you followed the above steps, you should now have a shiny new Lightsail VPS ready and waiting at your command! But, before we can install the SSH honeypot, we need to configure the VPS.
Here's what we're going to do:
- Limit SSH key access
- Connect to Lightsail VPS via SSH
- Change the default SSH port
- Set the correct time zone
Step 1
First, we need to limit access to the Lightsail's SSH key. On macOS (and other Unix systems) we do that using the chmod command, replacing [key-name] with the name of the key you downloaded when setting up the Lightsail instance (step 5, above):
chmod 600 ~/.ssh/[key-name]
This sets the permission so only your user account can access the SSH key.
Step 2
Now we can connect to your new Lightsail VPS vis SSH. To find out the IP address of the VPS, go to the Lightsail settings page (lightsail.aws.amazon.com/ls/webapp/home/instances), click on your instance, then look for the IP address under "connect to". You can also do this step using Amazon's browser-based SSH client, but once we change the SSH port the browser-based method will no-longer work.
On macOS, we can connect to the VPS using the following command in the terminal (for guidance on using other SSH clients, see SSH and connecting to your Lightsail instance):
ssh -i ~/.ssh/[key-name] ubuntu@[vps-ip-address]
Step 3
You should now be connected to your Lightsail VPS via SSH. The first thing we are going to do is to change the default SSH port (from 22). This is so the honeypot can run on port 22. To do this, edit the configuration file for the SSH server:
sudo vim /etc/ssh/sshd_config
NB: you can also use the terminal text editor nano to edit files.
Find the line that says Port 22 and change it to something else, such as Port 63531.
Save sshd_config then reload the SSH server daemon with the command:
sudo systemctl reload sshd
Next, open up the SSH port (that we just set) on Ubuntu's firewall. For Ubuntu 20.04, the command is:
sudo ufw allow 63531/tcp
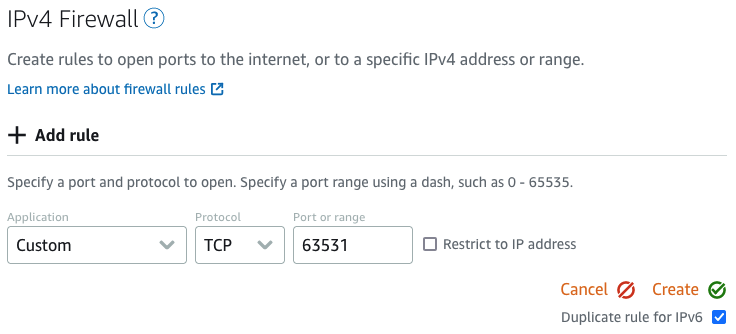
Finally, we also need to add a rule to the AWS Lightsail firewall. From the Lightsail settings page (lightsail.aws.amazon.com/ls/webapp/home/instances), select your instance, then select the "Networking" tab. Scroll down to "IPv4 firewall", and select "add rule". Enter the details: Application: Custom, Protocol: TCP, Port or range: 63531, then click "Create". As per the screenshot below:
To make sure everything worked correctly, open up a new terminal and connect to your Lightsail VPS using the new port:
ssh -i ~/.ssh/[key-name] -p 63531 ubuntu@[vps-ip-address]
If all went well, you should be connected to your VPS through the new SSH port.
Step 4
It's always useful to have the correct timestamps for our logs. So, let's go ahead and set the timezone for our VPS:
sudo dpkg-reconfigure tzdata
Then follow the instructions to select your timezone.
Excellent! We now have a new Lightsail VPS ready and configured. Let's move on to installing our containerisation environment.
Install Docker
To install Docker, we'll follow the guide at docs.docker.com/engine/install/ubuntu. We'll setup the Docker repository to make installation and future updates easier.
From your Lightsail SSH terminal, update the apt package index:
sudo apt-get update
Then install the required packages for the Docker repository:
sudo apt-get install \
    apt-transport-https \
    ca-certificates \
    curl \
    gnupg \
    lsb-release
Add Docker's official GPG key:
curl -fsSL https://download.docker.com/linux/ubuntu/gpg | sudo gpg --dearmor -o /usr/share/keyrings/docker-archive-keyring.gpg
Then we'll setup the stable repository (nightly and test repos are also available):
echo \
  "deb [arch=amd64 signed-by=/usr/share/keyrings/docker-archive-keyring.gpg] https://download.docker.com/linux/ubuntu \
  $(lsb_release -cs) stable" | sudo tee /etc/apt/sources.list.d/docker.list > /dev/null
Now we're ready to install Docker! Let's update the apt package index again:
sudo apt-get update
Then install the latest version of Docker Engine and containerd:
sudo apt-get install docker-ce docker-ce-cli containerd.io
We can check that Docker installed correctly by running the hello-world image:
sudo docker run hello-world
This should print a message then exit.
Fantastic! We've installed Docker!
Install Docker Compose
To install Docker Compose we'll follow the guide at docs.docker.com/compose/install.
First, we'll download the current stable version of Docker Compose:
sudo curl -L "https://github.com/docker/compose/releases/download/1.29.2/docker-compose-$(uname -s)-$(uname -m)" -o /usr/local/bin/docker-compose
Then we'll allow the binary to be executed:
sudo chmod +x /usr/local/bin/docker-compose
That's it! Docker Compose should now be installed and ready to go! We can use it by calling the command docker-compose, when we need it later.
Install the SSH honeypot
So, we now have a Lightsail instance configured, and ready to go. Docker and Docker Compose installed. All that's left to do is install and start the SSH honeypot.
The easiest way to setup the SSH honeypot we made in the previous blog post is to clone the Git repository:
git clone https://github.com/sjbell/basic_ssh_honeypot_with_downloader
Head into the honeypot's directory
cd basic_ssh_honeypot_with_downloader
Then start the honeypot with Docker Compose:
sudo docker-compose up
That's it! Your honeypot should now be running on the VPS. Feel free to connect to your honeypot (on port 22) to test it's working.
Optional: disable Ubuntu daily updates
Depending on the available resources of your Lightsail instance, you may find the VPS crashes (with CPU spikes) at certain times of day. Mine was doing this at 7am. First, check which timers are running with:
sudo systemctl list-timers
Then disable them with:
sudo apt-get remove unattended-upgrades
sudo systemctl stop apt-daily.timer
sudo systemctl disable apt-daily.timer
sudo systemctl disable apt-daily.service
sudo systemctl stop apt-daily-upgrade.timer
sudo systemctl disable apt-daily-upgrade.timer
Then reload with:
sudo systemctl daemon-reload
Just remember to run updates manually to make sure any bugs or vulnerabilities get patched.
About the author
 Simon Bell is an award-winning Cyber Security Researcher, Software Engineer, and Web Security Specialist. Simon's research papers have been published internationally, and his findings have featured in Ars Technica, The Hacker News, PC World, among others. He founded Secure Honey, an open-source honeypot and threat intelligence project, in 2013. He has a PhD in Cyber Security from Royal Holloway's world-leading Information Security Group.
Follow Simon on Twitter: @SimonByte